
Do YOU want to play Multiplayer College Basketball but not sure how it works? If so, then read on.
Here's what you need:
- FTP Server OR just email team files back & forth. I find this a bit annoying, so i opted for the FTP server. For FTP hosts, you have a few different options but all of them are relatively cheap. You can go with someone like A2 Hosts for $5/mo or my personal preference, Dave at Statsplus. If you choose to go with Statsplus then you can do $25 for 6 months or $40 for 12. Both options are less than $5/mo.
- Thats it really, everything else is all in game. The FTP server is a method of transferring team files and uploading the new file after every sim.
So how do I set it up?
Step 1: Create New Association & Select "Multiplayer"
Step 2:Enter Commish PW
Step 3:Configure Basic Game Setup Options (just like Single Player)
Step 4:Configure Association Settings (Just like Single Player)
Step 5: Create a Coach (Just like Single Player)
Step 6: Select a School then hit Finalize to create the league (Just like Single Player) -------- You could alternatively create all of your Multiplayer Coaches here by selecting "Save & Create New Player"
So the league is created at this point and its in Multiplayer mode. That means, you have to login as a Coach or Commish. The default player password is "password" and the Commish password is whatever you set it to be. Lets move on to Step 7.
Step 7: Login as Commissioner's Office via the password you set in Step 2.
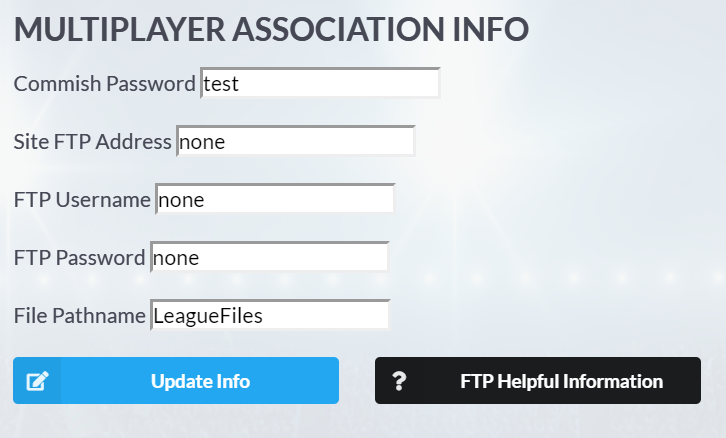
Step 8: Configure your "Multiplayer Association Info" with all of your FTP settings IF you are using FTP to transfer the file. Again, I highly recommend doing this. If you choose to go with Statsplus for your FTP, all of the info is provided for you by Dave.
Step 9: Download FileZilla. You can download any FTP browser of your choice, but I'm going to explain from this point forward from the Point of View of FileZilla. Reference the image below for the next few steps as this is what you will see when you open up FileZilla.

Step 10: Enter the "Site FTP Address" in the "Host" field of FileZilla. The "Site FTP Address" in-game is what you want to enter for the "Host" field in FileZilla
Step 11: Enter your "FTP Username" in the "Username" field in FileZilla. The "FTP Username" in-game is what you want to enter for the "Username" field in FileZilla
Step 12: Enter your "FTP Password" in the "Password" field in FileZilla. The "FTP Password" in-game is what you want to enter for the "Password" field in FileZilla.
Step 13: Click "Quickconnect
Boom, now you are connected to your FTP server. I understand this may be out of your comfort zone but we only need 30 seconds of courage here then I promise you can close FileZilla forever and return to your comfort zone.
Step 14: On the right side of FileZilla there will be a window that says "Remote Site" and it will likely have nothing in it. You want to right click that folder and select "Create Directory" Reference the picture below.

Step 15: Name that folder you created "LeagueFiles" (This name HAS to match what you put in the "File Pathname" in Step 8.
Step 16: Right-click that folder (LeagueFiles) and create a new directory and match the name of this folder to whatever your save game file name is. For example, if your league is saved as "MNA.cbb" then name the folder "MNA"
Step 17: Right Click the folder you created in Step 16 (e.g. MNA) and create ANOTHER folder (directory) named "Owner"
That's it. We are done. We created 3 folders and we will never again open FileZilla. However, we have more steps.
Step 18: Add new coaches from the "Your Office" screen when logged in as a Commissioner. You will need to enter a password (unless you want their password to be the default "password") and choose a team for them.
Step 19: Select "Edit/Add Coaches" on the right side of the Commissioner's Office screen and find the coach you just created. Edit their Current and Potentials to whatever you want. I usually cap potentials at 85 (Elite default setting) and adjust Current to 50 or something (Average default Setting)
Step 20: Now that you've added all of your coaches, assigned them to teams, set their attributes and all that good stuff, you're done with setup. SAVE THE GAME FIRST then select "Upload to Server". If you don't save your game first, then uploading doesn't upload the file with all of the changes you made.
That's how you setup the file. The setup part is done. Now we have to cover how to get your league file to all of your players.
Delivering the File to your Players
Step 1: Download WinRAR. You can use any compression software or tool you want, but I'm continuing from here under the Point of View of using WinRAR. It's free, just google & download it.
Step 2: Go to the main menu of DDSCB20 and select "Load Association". This will open up a window to select a league, INSTEAD of selecting a league, we are going to look at the location of the saved games at the top of that window. All saved games are in the "Draft Day Sports College Basketball 2020\app\disk\saves" folder but each computer will put this in a different location. To easily find your location, just follow this method.
Step 3: Go to your windows Start Menu (we are no longer in game, we are at the start menu) then search for "File Explorer". You may also have it on your task bar at the bottom of your screen, reference the picture below to see what the icon looks like.

Step 4: Go to your saved games folder and find your league name. If the league name is "MNA" then you want to Right Click the "MNA" FOLDER (there will be a league folder and a league file that ends in .cbb, we want the folder) and select "Send To > Compressed (zipped) Folder"
Step 5: Right click your newly created zipped folder and select "Open with WinRAR". If you get a pop-up to purchase WinRAR, just select "Close" you don't have to actually pay for it. It will still work.
Step 6: Open the folder that has your league name, e.g. MNA, and you will see a bunch of .coa files. You want to find the "commish.coa" file and DELETE IT. It is important that you only delete this from the zipped folder and NOT the original folder. If you delete this from the wrong folder, you will not be able to login as Commissioner's Office.
Ok so you are done removing the Commissioner's Office from possible logins. You are now ready to distribute the file to your players. You have to give your players TWO files. The zipped folder that you just created AND the .cbb file for your league (e.g. MNA.cbb). Send them both in an email, upload it to OneDrive/GoogleDrive or wherever but you must send both files.
-----------------QUICK DIGRESSION ------------
Player League File Setup
If you are a player and want instructions on setting this up, follow these instructions:
Download league Zipped file and .cbb file (e.g. MNA zipped folder and MNA.cbb)
Open Game > Load Association > copy the Saved games directory so you know where its at
Open File Explorer > Go to Saved Games folder > Paste MNA Zipped folder and MNA.cbb
Right click MNA Zipped folder and select "Extract Here"
Open Game > Load Association > Select MNA.cbb
-----------------DIGRESSION OVER ------------
So we created the league, setup the FTP info, setup coaches, distributed the league file to our players. So how do we actually play the game? Well, here's how it works
How it works
This is from the Commissioner Point of View.
Step 1: Login as Commissioner's Office
Step 2: Select "Download from Server" ---- This places all of the league exports into a Multiplayer folder. What the #$%^ is that, you might ask? Remember where your saved games folder was? Go to that location but instead of selecting "saves", you want to select "Multiplayer" and then select your league folder. If you don't use an FTP server, then the player's exports would be placed in this folder on their computer and they would have to send you the file so you could copy it into this folder. Not having an FTP server is for losers though, and we aren't losers so this process is simpler for us.
Step 3: I highly suggest creating a 2nd folder here called "MNA Exports" (or whatever you want) and copy every file that comes in to this folder. That means, once you "Download from Server" then there will be data in your Multiplayer folder. Copy those files here, its a backup.
Step 4: In game, go to "Import Team Files" in the Commissioner's office.
Step 5: Save Game
Step 6: Advance game
Step 7: SAVE GAME ----- THIS IS VERY IMPORTANT. IF YOU DO NOT SAVE BEFORE UPLOADING THEN IT WILL NOT UPLOAD THE MOST CURRENT VERSION, IT WILL UPLOAD THE FILE AS IT WAS ON YOUR LAST SAVE
Step 8: Upload to Server
You're done. Rinse and repeat.
From the Player Perspective
Login as your coach
During certain parts of the offseason, you will need to export from two different locations.
Location 1: Your Office - Any Roster/Depth Chart/Strategy/Recruiting/etc. changes will be in your "Export to MP" export from the "Your Office" screen.
Location 2: Buy Reports / Summer Camps - You will need to buy reports and Camps then "Export to MP" from that screen. If you don't, then you won't have any reports.
Bonus Pro Tip for Commissioner's:
When you "Download from Server" and look at your player's exports, it will look like the image below:
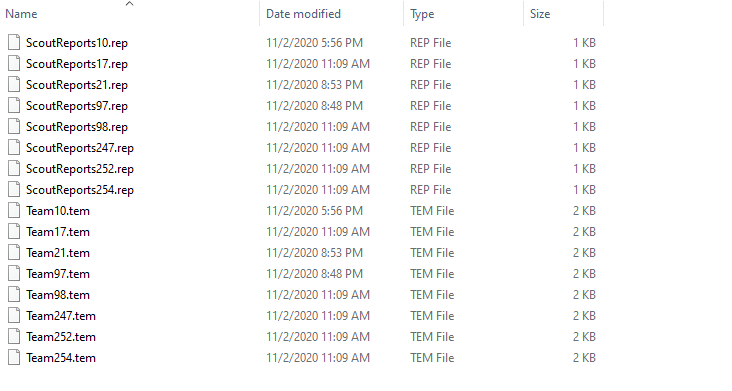
The numbers at the end of the file name (e.g. ScoutReports10 or Team10) is the Team ID. You can find the Team ID by going to School Info on Day 1 of the file and look at that schools RPI Rank. In the offseason, there is no RPI Rank so it shows their Team ID. They are alphabetical, so you could also just count what number they are from the drop-down menu but that seems way harder. The reason that this is helpful is because you can write down all of your User Team IDs and cross-check to see who is exporting.